10 DIY Notebooks

Thursday, January 29, 2015

If you know me, you know I love notebooks, and I love DIYs, and I love journaling. So I've compiled this list of all of my favorite notebooks DIYs that you can make this weekend!

Easy Homemade Journals (I made all these in an hour!) Click through for step-by-step tutorial1. Gift Idea: Homemade Journals by A Beautiful Mess

2. Stitched Notebooks by How Did You Make This?

3. DIY Chalkboard Notebook by Making Home Base

4. DIY Up-cycled Journal by Rook No. 17

5. DIY Ombre Journals by Damask Love

6. Mini Notebooks by Kaley Ann

7. Midori Notebook Tutorial by Fountain Pen Network

8. Tiny Notepads by Sarah + Abraham

9. Another Moleskin Notebook Transformation by Charmingly Modern 

10. DIY Notebook/Sketchbook/Whatever I Want to Use For It Book by Bee-Inspired


I hope these inspired you as much as they inspired me!! Leave a comment below with a link to your favorite notebook DIY tutorial. 

xoxo

17 Shortcuts to Make Your Morning Easier

Don't you hate waking up groggy in the morning, with a bunch of stuff to do, you're completely confused, and where on earth are those shoes you were going to wear?? Exactly. So I've compiled this list of tips to help you- and every single person on earth, because I'm pretty sure we aren't the only people with this problem.

Turn on all of the lights.1. Turn on all of your lights (the light will wake up your brain). 

2. Put your alarm clock on the other side of your bedroom so that you have to get up and walk over there to turn it off, thus waking you up a little more. 

3. Instead of planning your outfits the night before, spend about 20-30 minutes Sunday night planning your outfits for the whole week. 

4. Try an innovative iPhone alarm clock like SleepCycle to help you wake up when you aren't so asleep, therefore making you less groggy when you wake up (it's hard to explain). 

5. Invest in a satin pillowcase, it will make your hair less frizzy & messy (like my hair is all the time) in the morning. You'll save time brushing it trying to get all of those tangles out. 

You can also label hangers with days of the week to organize your pre-planned outfits.6. Use cute labels to label all of your pre-planned outfits. 

7. If you work out in the morning, sleep in your workout clothes to save time getting dressed in the morning. That is, if you have cute & comfy work out clothes. 

8. Place your keys (or bag) on something you don't want to forget when you leave. 

9. As soon as you wake up, sit up in bed, pump your fists, and say "YEAH!!". Trust me, it works. 

10. As soon as you wake up, stand up and start playing a game on your phone (No, Facebook & Instagram aren't games). It motivates your brain to wake up. 

11. Instead of watching TV in the morning, get on your computer- you're more likely to fall back asleep on the couch when watching TV. 

notebooks12. Before going to bed at night, get out a notepad (or start a list on your phone, if you're a tech-savvy person) and write down everything you need to do in the morning. You could even do it in the form of a checklist. Also, write down everything you can't forget that morning. 

13. Have everything in your bag, ready to go before you go to bed so you don't have to run around the house looking for things in the morning.

14. Instead of looking through the silverware drawer for a tiny spoon to stir your tea/coffee, keep little teaspoons in a jar by the coffee maker to save time looking for a spoon.

15. Before you go to bed, place your teabag in your mug to all you have to do is add boiled water, sugar and 1/2 & 1/2.

16. Keep your shoes next to the clothes your going to wear with the socks inside of the shoes to save time looking for them. I think I've spent at least 6 hours, total, looking for my shoes. 

17. This isn't really a shortcut, but as soon as you wake up in the morning, start writing in a journal. Write down your dreams, they are freshest in your memory as soon as you wake up.

Thanks for reading, I hope this helped you. Leave a comment below with any other useful tips c:

xoxo

Wednesday DIY Roundup #2

Wednesday, January 28, 2015

Time for some more DIYs!! These are from around the web, all Pinned onto my craft board on Pinterest here. I hope you can get a look at my craft board, I've got a bunch of helpful DIYs and other ideas on there. 

Sharpie Mugs1. DIY Sharpie Mugs and other Valentines Day Gifts by Buzzfeed

2. 15 Easy Wooden Crate DIYs by Brit+Co

3. DIY Not-so-ugly Storage Boxes and 48 More Organization Tips by DIYnCrafts

4. 10 Last Minute DIY Gifts by Buzzfeed

5. 33 DIY Gifts to Make in Less Than An Hour by Buzzfeed

6. DIY Reusable Chalkboard Labels on Jars by iDIY

7. DIY Ice cream Sandwich by Positive Med

Thanks for reading!! xoxo

Follow Me On Bloglovin

Tuesday, January 27, 2015

Follow my blog with Bloglovin

Don't forget to follow me on Bloglovin to get all of my latest posts in one place, along with the latest posts of all the rest of your favorite blogs!

How to Maintain a Cute & Tidy Workspace

Friday, January 23, 2015

As both a blogger and an artist, I like to keep a tidy workspace- which is difficult, considering I MUST have papers, pens, pencils, markers, etc. sprawled everywhere; all over my desk & the easel. So I've compiled a list of tidy tips to keep an organized workspace, because that is just completely necessary.

-Keep pens, pencils, markers, etc. in separate jars so that you don't have to dig through one drawer to find that one pen. Find a cute coffee mug or simply use a decorated Mason jar. 

-Papers should be sorted into stacks and possibly labeled with sticky notes or color-coded. 

-Keep a trashcan/shredder nearby so that you can immediately throw away crumpled up paper and other trash. 

-Make sure any books are lined up, using a plant as a bookend. Or, you can stack them and put the plant on top. 

-Change up your desktop background and browser theme! I got my cute desktop background from Fat Mum Slim here and I have cute cherry blossoms as my browser theme that you can get here

http://s3-ec.buzzfed.com/static/2014-10/2/14/enhanced/webdr04/enhanced-buzz-18912-1412273772-9.jpg
-Make sure you have a comfy chair; sitting uncomfortably whilst writing, drawing, and/or blogging is NOT good. You should definitely have a chair worth sitting in. 

-Keep a coaster on your desk in case you're constantly drinking something while working. 

-Hang up a mirror to give the illusion that there's more space.

-Hang up a few inspiring quotes to keep you motivated and positive!!

-Organize and label your wires so that they aren't in a tangled mess. 

-Hang up a calendar so you aren't constantly wondering what the date is and what you have to do that day. 

-Plug in your charger next to your computer so you don't have to get up every time you need to check your phone. 

-Put a plant in there to add a little life to your office. 

-Hang up a whiteboard or chalkboard to write little notes to yourself c:

-Make sure there's proper lighting; you don't want to strain those eyes of yours ;)

-Always have a notepad/sticky notes ready; you never know when an idea may strike. Also, you will need it to write down important info and phone numbers, etc. 

-Add a lamp for some instant warmth, or string up some white Christmas lights for a little festivity. 

-Be able to find your office supplies quicker using a cute little organizer. 

-Keep markers (such as Copics) in jars so that they're easier to find and see. 

-Eucalyptus leaves add a great touch of green, but don't require any work. Same with cacti!

Or make hanging clips for your cubicle walls with this paper clip hack.-Make an easy DIY bookend by painting rocks gold (to look like gold nuggets) or sew together a rice-and-beans filled bookend. 

-Hang up some string and use clothes pins to pin up a few photos. 

-Make some hanging clips to hang up on that same string using this easy paper clip hack.

-Spruce up your mouse pad (if you have one) using paint and tape. 

-Instead of keeping your Prismacolor pencils in the little plastic tray, put all of them in one ten and set it by your easel. 

-Use a tray to keep everything organized. 

-Put a nice pillow on your chair to make it comfy, or simply a sheepskin blanket. 


6 Tips to Blog Design

Thursday, January 22, 2015

Getting the right blog design can be extremely difficult- figuring out the colors, which fonts to have, what not to do, there's so much to it. It's time-consuming and can often cost you money, which is why I'm here with some free, simple tips that can help you master the overall design of your blog. 

1. Choose colors that go easy on the eyes. That means no hot-pinks, bright greens, highlighter yellows, basically ANYTHING that hurts your eyes. Pastels work good, simple colors, etc. But sometimes, neon is okay, and if you can make it work, that's great. 

2. Pick out some simple fonts that aren't hard to read. Calligraphy and super thin cursive wouldn't really work in a lot of cases, and neither would bold Hollywood letters and those weird funky fonts. Choose something really simple for the text on the blog posts, and then something a little crazier and out-there for the title. But then again, it's your blog, these are just some tips to help you out along the way c:

3. Have a couple of fun gadgets! You would want to focus on some that will help people to follow you on your social media. For example, I have a button for people to follow me on Google+ and a link to my Pinterest profile. People might be looking for your archives, and it wouldn't hurt to have a column with your most popular posts.   

4. Pages/tabs are a must-have. Some tabs on your blog that you might want to have would include an About page and a Contact page, and if you have one, a Shop page. These are great to have, and easy to make with Blogger, simply go to the Dashboard, click on Pages (right below posts), and click on New Page, right next to Publish. 

5. Choose a background that is relevant to the subject of your blog. Mine is pretty much just some fancy swirly-type things, but if you're doing something like a weight-loss blog, you might want some food. I know Blogger offers some great backgrounds, and with most, the colors are customizable. (No, the colors on mine aren't customizable, just gray. But that's okay, because I like gray)

6. Get rid of that verification-thing in the comments section. Usually, as soon as someone has to do that, they pretty much NEVER comment and sometimes don't even come back to the page. Nobody likes the word verification, it's annoying, and I don't recommend putting it in your comments section. 

Thanks for reading, I really hope this helped. xoxo
P.S. If you have anything you think I should add, comment below c:

5 Tips for Starting a Blog

Wednesday, January 21, 2015

I've written a lot of posts on blogging tips & tricks, but if you don't have a blog, they're pretty much useless to you and all you can really do is ignore them. Which is not good- you should start a blog. 

I'm not gonna lie to you, blogging isn't as glamorous as it looks- but I must admit, I enjoy it. You're basically just sitting in your PJs at a laptop pondering over ideas and ideas, trying to pick out just one. At least, that's what I do. It isn't always very easy, and if you're looking to make a little money, you'd better be dedicated. I don't mean to make blogging sound terrible- it is a creative outlet for all people, of all sizes and all ages. Try it out- if it's not for you, try a different blog topic, but don't quit. Most bloggers (pretty much almost all so-called bloggers) quit their blog and abandon it after 2-3 months. But I didn't do that- because I'm gonna make this blog last. Anyway, the tips. 

1. Where to start? Blogger or Wordpress? Personally, I love Blogger- it's free, easy to navigate, easy to learn to use, and just perfect. Easy to access stats, easy to design, easy to write a post, and just so simple. Seriously, I recommend Blogger.

2. Your first blog post- so simple, and yet how do you choose? Personally, I would recommend a picture of you, a few words about yourself and what your blog is about. If you think of something else, great, leave a comment below. 

3. Choose an eye-catching blog design. But not too eye-catching. Not too much neon and distracting pictures, if you know what I mean. Pick out a font you like, and don't be afraid to add a few gadgets- add some that will help your readers follow you on Google+, Instagram, Twitter, etc. Add a few pages, some links to your social media, and you're done.

4. Write a few more blog posts. Write at least 10-15 before trying to catch the eyes of the people that you want to read your blog. But always remember- quantity should never beat quality. Simply write a few posts that reflect your blogs topic. 

5. Now share your blog with the world!! Share all of your posts on social media, tell your friends, and most importantly, comment on other blogs. This helps other people browsing that blog click on your link and get to your blog. 

YAY! You have a blog now! If you just made one, comment a link to it and I'll make sure to check it out.

21 Places Where I Get Inspired

Inspiration comes from many different places and is so different for everyone. For me, these are the top 11 places I go to get inspired. Some are places, others are things. Feel free to comment the top 11 places that get you inspired!!
 
1. The library.

2. In the shower.

3. My moms chicken noodle soup (YUMM!!). 

4. On Pinterest.

5. Looking at a blank journal.

6. Walking my dogs in the field. 

7. Decorating with washi tape.

8. Early in the morning, staring at the sun rising.

9. In the summer time, playing outside at 6:00 on a Friday evening.

10. At the bottom of my pool (in the deep end). 

11. On my favorite blog, Fat Mum Slim. 

12. At my easel with my sketchbook, pencils, Copics, and Sharpies.

13. Sitting at the kitchen island with a cup of warm tea. 

14. Watching Project Runway: THREADS. 

15. Watching The Legend of Mick Dodge. 

16. Eating a DQ blizzard.

17. Hiking at Lake Selmac & 8 Dollar

18. Blogging.

19. Cleaning & organizing anything.

20. Inside of my warm, cozy house when it rains c: 

21. Watching Mary Doodles

Post Topics to Write About When You Have Bloggers Block

Most bloggers (that I know of) get bloggers blog, a severe case in which they have NO idea as to what to write about. You've tried everything- I have actually written many posts on the topic of figuring out what to write about, and this particular one offers a few topics that will catch the eye of your audience. I hope they helped, comment any ideas or feedback as to what you think people with bloggers block should write about c: 

-Your worst memory.
-Your best memory.
-Why you started blogging.
-Your favorite day of the week & why. 
-Your favorite food to cook.
-Describe the environment you are currently blogging in.
-Your photo editor of choice (PicMonkey, Aviary, etc.)
-When you started blogging.
-Your favorite magazine.
-A letter to your past self.
-A letter to your future self. 
-A letter to someone (anyone). 
-What it would be like if your pet wrote a blog post.
-Describe what your pet would be like if they were human. 
-A photo of yourself.
-One of your favorite YouTube videos. 
-Your favorite restaurant. 
-Your favorite food.
-What you love most about blogging. 
-Your most useful and inspiring blogging tips. 
-Your favorite blogs. 
-What makes you happy. 
-Your favorite things about the Summertime. 
-Your favorite things about the Wintertime.

Yay! 300 Blog Posts!!

This is my 300th blog post!! YAY! I've written about so many topics for so long, including nail art, DIYs, journaling, Pinterest, blogging tips, books, other blogs, drawing, etc. This blog would pretty much be nothing without an audience, considering I'm just a ginger drinking tea and typing on a computer. This blog, if you remember, started out as Zillio. I hated that name so much, so I changed it to something I love- the sound of rain on a metal roof. Thanks for reading, I hope you continue to come back every day for years to come. Thanks for reading c:

xoxo, Savannah

5 DIY Nail Art Tips

Added Tip:  Stripe polish onto a piece of foil or coated paper plate. Swirl/blend with a toothpick where colors overlap. Pick up the color on your sponge & go!  Now, even I can do that! ;)     *****       Gotta be fast to do this. Maybe too fast for me. But at least now I know how they do it.  :)  Nails ideasIf you love nail art (I know I certainly do), then you are probably going to like these tips. They can help your nail art look as fabulous as the stuff you see on Pinterest (the stuff they say you can DIY). I hope they help c:

1. While your nails are still a little wet (but not too wet), try dipping them in some icy water (not too icy, but really cold). They'll dry quicker that way.

2. Use Scotch tape to get the most perfect edges. Trust me, tape is going to save your butt on a number of occasions. 

3. Use a sponge to create gradient and ombre nails. I've included a tutorial in this blog post c:

4. Stick a bobby pin in a pencil eraser to make an instant nail art dotting tool. 

5. Instead of one thick coat, do 2-3 thin coats. They dry faster, and one thick coat is going to get messed up really easily. 

Poets & Writers Magazine

Tuesday, January 20, 2015

I just ordered a one-year subscription to Poets & Writers magazine and I can't wait till it comes. I've been meaning to get it for a while now, but never subscribed to it. Writing is my passion and this magazine should help em to grow and be inspired. Comment whether or not you read this magazine. When I get my first issue, I'll post a picture and tell you how much I like it c: xoxo

7 Places To Look for Inspiration When Blogging

If you have blogger's block and need inspiration when you don't have anything to write about, then here's a list of places to look for inspiration when you have no idea what to do. 
 
1. Read your favorite blog and use one of their most popular topics, or your favorite topic of theirs. 

2. Expand outside of your office- find someplace else to write a blog post. 

3. Keep a notepad by your bed or in the bathroom so that you can write down ideas as soon as you get out of the shower. Am I the only one that gets ideas in the shower?

4. Ask your readers what they want to read about, and do something related to your most popular blog post(s). 

5. Do something that personally inspires you- watch a favorite movie, listen to that one song, have some chocolate cake. Yumm.

6. Get on Pinterest and get Pinspired. (Yes, I just used that word)

7. Don't write anything- just post a photo you took. After all, a picture's worth a thousand words. 

30 Day Blogging Challenge

It's raining outside. You're eating a cookie and drinking some warm tea. The time is right to blog- (or read, it looks like the perfect environment for that, too) but you have no ideas. So you look for inspiration. This is me half the time, and I usually look for inspiration in a lot of different ways. So here's a 30-day blogging challenge to help you find some inspiration when there's no where else to look. I encourage you to start today c:

Day 1: A picture of you and a few words about yourself to let your audience get to know you.

Day 2: A list of things you like. I suggest puppies.

Day 3: A list of things you dislike. I suggest puppy poo-poos.

Day 4: A photo of a craft/something you made. (Not a baby)

Day 5: Something you drew. It doesn't have to be good, and you don't have to be an artist. 

Day 6: A couple of goals for your blog that you wish to accomplish. 

Day 7: Some blogging tips you use that you would recommend to your audience.

Day 8: Your blogging space/workspace. Atleast, the one you use most often, in case you move around (I do). 

Day 9: Your pet (if you have one). If you don't have a pet, take a picture of a strangers pet. 

Day 10: Something you ate that day.. Whether it be smoked salmon or a Cheeto, write something about it. 

Day 11: Something you've been working on... A work of art, a DIY, the world may never know..

Day 12: Tell your audience how you plan out your posts- a planner, a list, something. I'm thinking of doing this. 

Day 13: Recommend some of your favorite blogs to your audience. Better yet, recommend me. Or, this blog. Either way, email me your blog address and YOU CAN BE OFFICIALLY AWESOME!

Day 14: Write a few sentences about your favorite thing ever. In the whole world. Your favorite thing, whether it be tea or puppies; or AMERICA. FREEEDOOOMMMM!!

Day 15: Post a few of your life goals; here's one of mine: write a book.  

Day 16: Post 3 things that made you smile today. c: 

Day 17: Post 3 things that made you laugh out loud today :D

Day 18: Describe what your pet would be like if they were human. If you don't have a pet, use someone else's. 

Day 19: Post a photo of you when you were younger, preferably a child. 

Day 20: Write a list of your favorite TV shows. 

Day 21: Write a list of things you're grateful for. 

Day 22: Write a post about something you're really good at (drawing, organizing, DIYing, etc)

Day 23: Post a picture you took outside. 

Day 24: Tell your audience what you think your past life was like.

Day 25: Try blogging somewhere else for a change- like the park, a coffe shop, the laundry room. 

Day 26: Write a post about your bucket list.

Day 27: Write a post about your anti-bucket list. (What you don't want to do before you die)

Day 28: Write about where you want to go and why (whether you be traveling or going out to a restaurant) 

Day 29: Write about what inspires your blog posts.

Day 30: Take a break and write about whatever you want! IT'S FINALLY OVER!! c:

xoxo

3 Things That Made Me Smile Today

Smiling is one of those things that makes your day totally worth it. Staying in bed and watching Netflix and sketching all day (though enjoyable) isn't the same as smiling when your dog lands face first in a cow pie. These are 3 things that made me smile today, and I invite you to comment 3 things that made you smile. 
 
1. Playing with my dogs, Darwin & Seamus.

2. Drawing something amazing.

3. Coming up with new ideas for blog posts. 

What made you smile today? xoxo

DIY Roundup #1

I realize I've done a lot of DIY posts lately, and I promise this will be one of the last ones for today Unless you like DIYs; but I don't know what you like. So post a comment, tell me what you think. I can't tell whether or not you're really there if you don't comment.

DIY Tissue Paper Garland tutorial by Miss Vicky Viola 

Simple Spiral Notebook Redo by Polkadot Chair

DIY Marble Top Table by Rain on a Tin Roof

DIY Faux Malachite Tray by Rain on a Tin Roof

DIY Washi Tape Keyboard by Her New Leaf

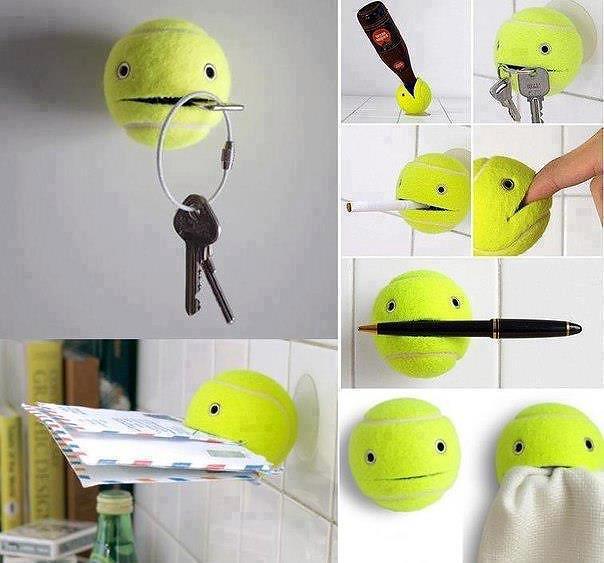
Tennis Ball Mail & Keys Holder

Make Your Own Washi Tape Tutorial by The Gunny Sack

Wee Weaving

Monday, January 19, 2015

Wee Weaving

Adorable Tiny Pom-Poms by Miss Vicky Viola

More in-depth instructions here.

Pee-Wee Pom Poms

4 Journaling Tips to Help You Start a Journal

If you've ever tried to start a journal but failed, then these tips should definitely help you set aside the time to actually write in one instead of just buying it and letting it sit on your desk for an hour while you talk to your cat about it. Anyway, if you have any tips that you think will help people, then comment below and I'll consider adding it to the list c:

1. Set aside a certain amount of time every day to write in it. This amount of time can vary from 5 minutes to 20 minutes, or whatever works for you. 

2. Remember- there's no limit to how much you should write. At least, in my opinion, I don't really think you should set a limit.. Unless you come up with a totally valid reason. Writing doesn't really bring any harm (so far). 

3. Write down a few ideas for what to write about. There are so many different types of journals out there, and I even have a post on some of my favorites. Here's the link to that post, just in case you're at a loss for ideas.  

4. Bring it everywhere you go. Not literally, I doubt you'll need it taking out the garbage, but some places you go. Some place you might have to be waiting for a while, or maybe on vacation, perhaps to a trip to the river. Just don't get it wet when you go swimming.. But, unlike a digital journal (I have nothing against those, I just prefer a physical notebook/journal), dropping this on a rock, down the stairs, against someone's face, etc. won't break it. I'm serious, I've tested this theory. 

I Made This

Sunday, January 18, 2015


The bag, not the pen and paper.

I Made This Cookie


And yes, it was delicious.

6 Yummy Teas That I LUVVV

You probably already know that I LOVE tea, I drink it every morning, and think of it as a part of life. But do you ever start wondering what kind of teas I love? I'm a simple person, nothing fancy. But these are just the kinds that I drink in the morning (and sometimes at night). Yum c:
 
-Twinings Earl Grey tea

-Twinings Lady Grey tea

-Twinings Irish Breakfast tea

-Celestial Seasonings Nutcracker Sweet tea

-Celestial Seasonings Sleepytime Extra tea

-Trader Joes Well Rested tea

DIY of the Week: Washi Tape Wall Art


Workspace of the Week: January 18

Also, here's a link to 54 Ways To Make Your Cubicle Suck Less on Buzzfeed.


Love this beautiful home office from In My Own Style #bloggerstylinhometours

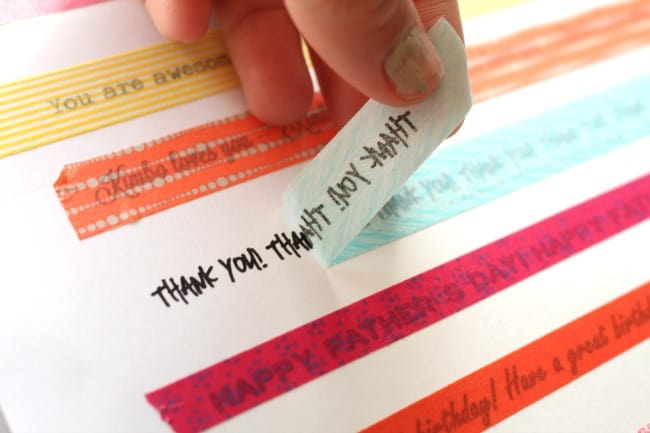
Get Words On Your Washi Tape

washi tape with wordsThis is undeniably awesome. I shall proceed to do this when I am done with this post (and my cinnamon roll & tea). 

1. Print out some words in your favorite font (or write something in Sharpie) on a piece of paper. 

2. Place the washi tape on top and press down for a few seconds. 

3. Peel off and YOU'RE DONE YAAY!!!

6 Different Types of Journals To Try

I love journaling- and there are so many different kinds you can write. These can all be combined into one book, or even with multiple separate ones. Organized or not, fill up that journal with your life. I've also included some journal prompts if you're starting a letter journal... ;) Also, if you've got a journaling idea and think I should post it, comment your idea below!!

I recently talked about several different types of journals you can keep. Moving forward, I’d like to explore some of those options in greater detail—because journaling is fun and I want to help ma...
-A gratitude journal- to record anything and everything that you're grateful for. Simply write down 3 things every night, (and if you want, 3 more things every morning) and BOOM- a gratitude journal. 

-A letter journal. This is very simple, you're just writing letters to people and never sending them. They can be interesting and fun- I've even included some prompts in the photo. 

-An idea journal- the must-have for your DIY, crafty self. Things you really want to do- build a dog house, make soap, paint the Mona Lisa as a cartoon. The ideas are endless- especially if you just want to write these down when you know you'll forget them in the future. Keep this by the bed and by the shower, considering that's where most people get their ideas. I usually get them in the shower. 

-A blog idea & scheduling journal. These are great for you bloggers out there- simply jot down some ideas for a blog post, when you're going on vacation and what to post about, what to write and what not to write, when to write, etc. The possibilities are endless, and this will help you organize everything about your blog. 

-A list journal- for the OCD in all of us. This journal can be a personal record of to-do lists, favorites lists, grocery lists, bucket lists, places you've been, places you want to go to, etc. This is pretty much for that person who loves lists... (me) 

-A travel journal- because you are probably ALWAYS traveling. (also me) Great for business trips, car trips (I drive to Seattle pretty often), family vacations, camping trips, etc. Just record everything you did, everything you saw, sketches, doodles, descriptions of those wierdos on the plane, maybe you got stuck in traffic, ANYTHING. Spring break is coming up, you might want to start one for that Hawaiian vacation.. **wink wink**

Thanks for reading!! xoxo

DIY Inspiration List (With Lots of Washi Tape!)

Saturday, January 17, 2015

It's raining, there's nothing good on TV, and you've got lots of time this Saturday. Need something interesting to do this weekend?

I made a DIY inspiration list for you to bookmark to look back on when you need something to do. Feel free to comment anything I should add c:

-Collect a bunch of corks, make a homemade cork board (this is on my to-do list!!)

-Decorate something (ANYTHING) with a little washi tape (clothes pins, picture frames, wall art, etc.)

-Start your own blog (it's not much of a DIY, but it's a place to share your projects!)

-Make your own duct-tape wallet (instructions HERE

-Make your own little fairy garden!! Ideas here!

-Paint something, then add polka dots with Gold Sharpie!
Use it to mark a calendar. | 56 Adorable Ways To Decorate With Washi Tape
-Make a DIY calendar using washi tape!!

-I've said so much about washi tape, ILOVEITSOMUCH, here's a link for 52 Adorable Ideas on Buzzfeed!!! *excitement*

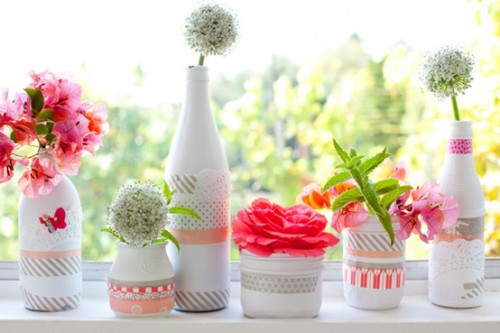
-And since we're on the subject, why not make your own washi tape? All you really need is tissue paper. Very helpful and easy instructions here

-Hang up a rope/some twine and use some clothes pins to pin up your masterpieces. 

-Hang up some more rope/twine and store your rolls of washi tape in a decorative and fashionable sort of way.

-To light up your home on the darkest of days, hang up some plain Christmas lights- they aren't just for the holidays.

-Hollow out an old book for some *super* secret storage... Yay!! c:

-Decorate your clothes hangers with duct tape, washi tape, or fabric.

SUPER easy and darling washi tape chore chart!  Takes about 10 minutes to put together, and is really effective for the five of my kids that are using it.-Make a super easy chore jar using popsicle sticks.. 

-Trace your hand on a piece of paper, and use Sharpie to decorate around it (or inside of it), leaving either the hand or the background completely white. (I just came up with this, I think I'll try it)

-Cut out some strips of an old t-shirt, and braid them together to make a cute bracelet!!

-Tie some ribbon around a Mason jar for some adorable storage, or simply decoration. 

-You can also use popsicle sticks, washi tape, and Sharpies (maybe some yarn?) to make an adorable mini picture frame. (I'm thinking of making one of these myself)

-This is something I suggested in a previous post, about making an achievement jar. Simply decorate a Mason jar, and write down your achievements. Stick them in the jar throughout the year, and on New Years Eve, you can take them out and read them all!

-Make a couple of homemade cards for future use, when you might be in need of a birthday card or a Christmas card for someone, and don't have the time to make one right then, or buy one. Get creative with it, break out the art supplies!!
Washi Tape Christmas Cards

-Always in need of a hair tie, and have them scattered everywhere? I keep all of mine (also some headbands) in a fancy jar you can find at any dollar store. BONUS: Decorate it with washi tape. 

-Make your washer & dryer extra decorative with some washi tape, making stripes and polka dots. 

Thanks for reading, I might update it with more soon. I hope you can try these out soon!! xoxo


Nail Art Saturday

Saturday, January 10, 2015

Super idée !! http://www.educatel.fr/domaine/6-esthetique-coiffure/formations/17-prothesiste-ongulaire

Nail Art Saturday

Frozen Forest winter nail art, monochrome gradient and artsy trees stamping manicure | Sassy Shelly

Nail Art Saturday!!! (WOOP WOOP)

Foxes | Community Post: 14 Insanely Cute Animal Nail ArtYay! Happy Caturday, it's time for some nail art of the week. These are red fox nails, and here is a link for more adorable animal nail art on Buzzfeed.

How I Started Blogging

Every blogger has their own story on how and why they started blogging. This particular one is mine. 

This blog (Rain on a Metal Roof) started off in May 2014 with a really nerdy post. I've always been a good writer, but had never been really interested in blogging until I started a blog a few years ago. Many have been deleted, but this blog has definitely survived and thrived in the company of this amazing blogging community. 

I honestly have no idea what subject this blog is on, like, AT ALL. I write about a lot of different things- blogging, writing, DIYs, pretty much everything possible. I change my mind a lot, leading to varying subjects on my posts. I get inspiration, ideas, requests, every little thing that makes me want to blog usually makes it into a post. 

I've always loved writing, being part of a community, and being online (that makes me sound antisocial, doesn't it??). I just never pieced those things together into a blog of my own, that I could customize and fulfill to my interests. The idea of a website was interesting, but I didn't really want to pay. All I knew was I wanted to share my creativity and inspiration with people.

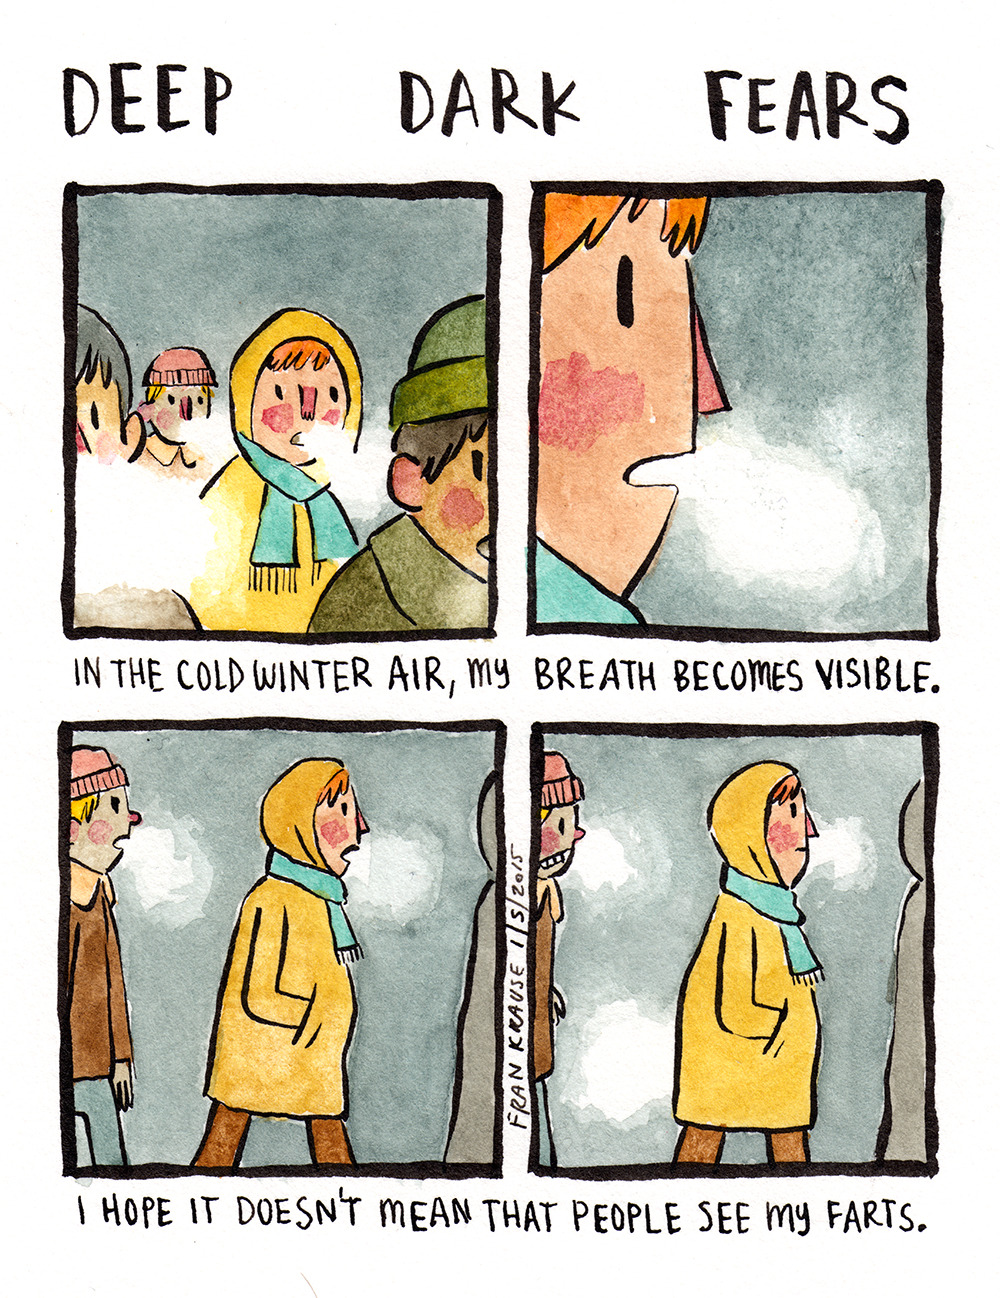
Deep Dark Fears

A fear submitted by Ezequiel to deep dark fears. Buy prints here.

Draw 21 Darth Vaders! by Mary Doodles

7 Things That Make My Head Explode

This is simply a list of everyday things that happen every once in a while, that drive me just a little cray-cray. Comment something that makes your head explode every once in a while. 

-When that person put the milk jug back with not even enough milk for a cup of tea. Seriously, it's *empty*. 
-When the cat suddenly decides it's time to sleep on the keyboard, and ends up restarting your entire computer right in the middle of a blog post, and then you can't figure out how to turn it back on, and when you do, they somehow changed ALL of your settings. And then they do it again. 
 -When you're trying to open a can of soup and the "easy pull" tab breaks off. Well, no soup today. (On a completely unrelated topic, my favorite soup is chicken noodle)
 -When that one person always uses the wrong "you're" and "your".
 -When the same person as above mixes up "there", "they're" and "their".
 -When you're in line and the person behind you decides that the line will go 100% faster if they stand on top of you, breathing down your neck. Thanks, random person at Costco.
 -When that one person is too lazy to even replace the toilet paper... *double head explosion*

Organize Your Life: The Laundry Room

If your laundry room is slightly unorganized and you have trouble searching for clothes to wash, trying to tell what is clean and what isn't, then this may help you. 

1. Have on laundry basket for everything clean. As soon as your clothes come out of the dryer, put them in this laundry basket. Then bring it to wherever you'll be folding them. 

2. Have more than one dirty clothes basket. That way, one can have towels, the other can have clothes, and if you want, one more for delicates. Now, you won't be digging through that pile of dirty clothes just to find that one tea towel. 

3. If you've got the space, put a table in there just for folding laundry. BONUS: Watch Netflix on your iPad while you do it. 

4. Again, add a plant. This may be irrelevant, but it adds a little decoration and life to your laundry space. Nothing fancy, just something you can stick on the window sill. 

5. Chances are, your washer & dryer aren't as fabulous as they could be if you just put a little washi tape on them. That's right, dress 'em up!! 

6. This is something I should have said in the beginning- pick up the clothes off the floor and sweep the floor, it makes a huge difference. Just don't put the clothes BACK on the floor. 

7. Add a nice little rug, like a bath rug. Just something comfy for your feet while you load and unload the washer & dryer. Plus, it adds a nice little decoration. 

8. Have easy access to your laundry soap & stain remover, but keep them out of sight, such as in a cupboard. 

9. Keep a jar in there for all of the moneys you find while laundering c: 

Theme by: Pish and Posh Designs